Showing posts with label SQL Server 2012. Show all posts

Tuesday, May 19, 2015

How to Loop through each record in a SSIS in-memory ADO Recordset Table

In this post we describe Step by step How to Loop through each record in a SSIS in-memory ADO Recordset Table  ,  in Sql Server Integration Services.
In this article we create from scratch a small SSIS application which uses the Foreach SSIS item for a loop through all records in a table.
Your table can be a SQL OLE DB table , an Excel , a raw file , an ADO NET table , an XML . The source of it does not matter, since we'll copy its rows inside an in-memory table , and loop over it.
For this example, we'll loop over all records from an OLE DB SQL Table, in order to send emails to all the "Contacts" in the table.
Our pilot SSIS application will show as the following:


How to Loop through each record in a SSIS in-memory ADO Recordset Table 


First , search in the Toolbox for the Data Flow Task item:

How to Loop through each record in a SSIS in-memory ADO Recordset Table 1

Open it for "Edit" , and add an OLE DB Source:


How to Loop through each record in a SSIS in-memory Table


In the "Edit" mode, set a Connection Manager , and add the following SQL Command:

Loop through each record in a SSIS in-memory ADO Recordset Table

As you can see, our command loads all ercords in the Contact table from Adventure Works:


through each record in a SSIS in-memory ADO Recordset Table


Next, add (this is optional) a Derived Column item , for editing the columns, if you need it.
For this example, we don't edit it. Just drop this item in the Data Flow.
Next, append a Recordset Destination item, in order to keep all fetched records in RAM memory.
Your Data Flow Task should now look as this:


How to Loop through each record in a SSIS in-memory ADO Recordset Table 2

At this point, the Recordset Destination will require an Object variable where to keep the records.
Therefore, create a new variable with "Package" scope as follows:


How to Loop through each record in a SSIS in-memory ADO Recordset Table 3


And then, set the  Recordset Destination's  "variable name" to this variable:

How to Loop through each record in a SSIS in-memory ADO Recordset Table 4

And now, select all the columns that you want to be included in the in-memory table:

How to Loop through each record in a SSIS in-memory ADO Recordset Table 5

Take a close look at the ORDER of this columns: this is going to be very important in the next steps.

Now, add a Foreach Loop Container, which will loop through the in-memory Table:


 SSIS in-memory ADO Recordset Table

In every loop iteration , the current record's data will be copied to the correspondent variables, which now we are going to create as follows:

 in-memory ADO Recordset Table

You must respect the types of the columns being copied: NVARCHAR goes to STRING, and so on.

Inside the  Foreach Loop Container, in "Edit" mode, set the Enumeratoor to  "Foreach ADO Enumerator" :


How to Loop through each record

And tell SSIS that you want to loop through the Object variable that you set before:


 SSIS in-memory ADO Recordset Table


Also select the "Rows in the first table" option.

Now, set the variable mappings EXACTLY IN THE ORDER that they were set inside the ADO in memory table:


How to Loop through each record in a Table

That means, the current record value for the column "ContactID" will be copied to the "iContactID" .integer variable, and so on


That's all!!!! 
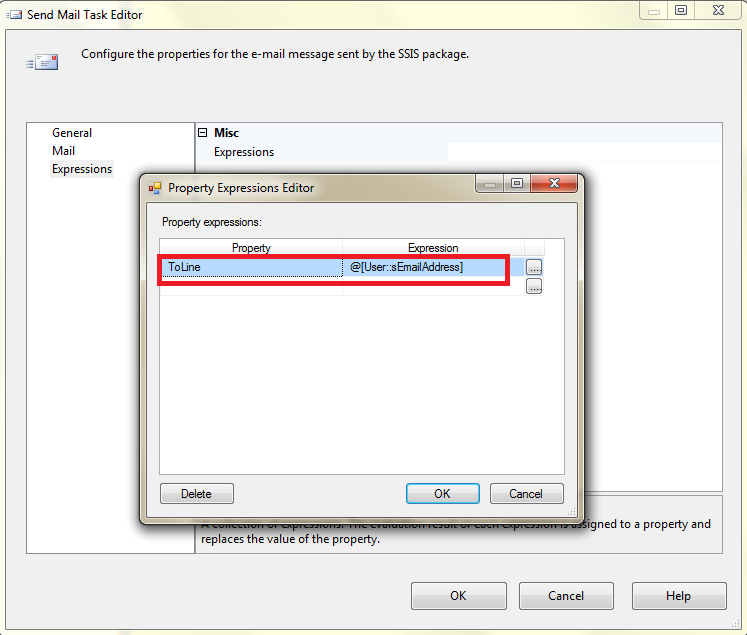
Now you will use that loop for example to send emails to all the Contacts in the table, setting the required parameters with the values from the loop variables: 


How to Loop through each record in a  in-memory  Table

Hoping this article was useful to you...


      by Carmel Schvartzman


כתב: כרמל שוורצמן

Wednesday, April 22, 2015

How to Execute a CRM Workflow from SSIS - Dynamics CRM and SSIS Integration

In this post we describe Step by step How to Execute a CRM Workflow from SSIS - Dynamics CRM and SSIS Integration  ,  in Sql Server Integration Services.
In this article we create from scratch a small SSIS application which calls - executes a Dynamics CRM workflow (this walkthrough applies to SQLSERVER 2005-2008-2012) . You can schedule this SSIS application to run in the middle of the night , and automatically perform , for example, CRM email sending to customers . For example ,  you could add the small application which we design here , to a bigger one as the following:


How to Execute a CRM Workflow from SSIS - Dynamics CRM and SSIS Integration 


First , open the Toolbox and find the Data Flow Task item:


Execute a CRM Workflow from SSIS - Dynamics CRM and SSIS Integration

Add it to your SSIS application, and click on the "Edit" .
Inside the Data Flow Task item , add a Data Flow Source of your convenience (it can be a raw file, ADO NET, OLE DB , Excel, XML , or even a Dynamics CRM source) .
Connect to it some Data Flow Transformation (such as a Derived Column or a Data Conversion).
We are using here a Dynamics CRM and SSIS Integration tool from KingsWaySoft. 
According to the   KingswaySoft  Help manual which can be found here , starting from the version 3.0 of this tool, there is an option for calling a Dynamics CRM Workflow from SSIS. 
Therefore, look for a Data Flow Destination of the type "Dynamics CRM Destination", and append it to the previous items ,  sequentially connected:


How to Execute a CRM Workflow from SSIS - Dynamics CRM and SSIS Integration 1


Your Data Flow Task should by now look as the following:


How to Execute a CRM Workflow from SSIS


Now we'll edit the Dynamics CRM Destination's properties, to make it able to execute a CRM Workflow.
Open the "Edit" window in the Dynamics CRM Destination , and select the "Execute Workflow" option at "Action":


CRM Workflow from SSIS

The "Destination Entity" should be the ENTITY over which you want the Workflow act.
At the "Execute Workflow Option" you will be able to choose between all the available activated (published) workflows which are set to run over the current Entity.
Select the Workflow that you want to call from SSIS.
Then open the "Columns" tab:


 Dynamics CRM and SSIS Integration


This tab will automatically contain only one column. A very important Entity property will appear here: the ID for the Entity record on which you want the workflow to be run.
This property is of GUID type. However, you send it a string containing the required ID. It doesn't need to be of uniqueidentifier (GUID) type: as you can see at the snapshot above, we send a DT_WSTR SSIS type with length 100 . Also, the length doesn't have to be the length of a string containing a guid , that means 36 (32 digits plus 4) . 
That's all that the Dynamics CRM Destination item needs to execute your Workflow.
Build the SSIS application. Run it in debugger mode (F5) , and your workflow will be triggered!!!
If you receive an error message, just try to run your workflow by hand, right from the CRM entity form, because probably the cause of the error will be there.
Hoping this article was useful to you,

Happy programming.....

      by Carmel Schvartzman


כתב: כרמל שוורצמן

Thursday, April 16, 2015

How to use SQL parameters in an Execute SQL Task in SSIS

In this post we describe Step by step How to use SQL parameters in an Execute SQL Task  in SSIS , to avoid the error : "Parameter name is unrecognized." ,  in Sql Server Integration Services.
We comply here with the recommendations introduced by Microsoft in the MSDN SQL Server 2014 documentation for SSIS : (applies also to SQL 2005) . For sampling using parameter names in an Execute SQL Task ,  we use the following SSIS application:

 How to use SQL parameters in an Execute SQL Task


How to use SQL parameters in an Execute SQL Task  in SSIS


We want to adequately name SQL parameters in order to avoid  a runtime error at an "Execute SQL Task", as seen in the snapshot above   : "Parameter name is unrecognized." :


     How to use   Execute SQL Task


At the  MSDN Documentation, can be learned that using SQL  parameters in OLE DB must be done as follows:

How to use SQL parameters in an Execute SQL Task 1


Therefore if we have an SQL query using parameters, we must use the "?" marker as follows :

 How to fix the SSIS error :  Parameter name is unrecognized. 1


Those parameters will be mapped to the query, indexed on base "0" then, since we have 4 "?" markers, we should add 4 parameters indexed from "0" to "3" :


      WHEN ?  - ? <  0  
         THEN ....
      WHEN ?  - ? > 0   
         THEN   ....


 How to use SQL parameters   2

As you see, the parameters names are integer numbers conforming index positions.

We hope this article was useful to you.

Happy programming.....

      by Carmel Schvartzman


כתב: כרמל שוורצמן

Monday, April 13, 2015

How to fix the SSIS error : "Parameter name is unrecognized."

In this post we describe Step by step How to fix the SSIS error : "Parameter name is unrecognized."   in Sql Server Integration Services .
We implement here in just 5 minutes the conventions introduced by Microsoft in the MSDN SQL Server 2014 documentation for SSIS : (applies also to SQL 2005-2008) For sampling this fixing we use the following SSIS application:

 How to fix the SSIS error :  Parameter name is unrecognized.


How to fix the SSIS error : "Parameter name is unrecognized."


In the snapshot above it can be seen that there is a runtime error at an "Execute SQL Task" :
 SSIS error :  Parameter name is unrecognized.


As it is sensible to do, we have defined an SQL parameter and named it "ComputerName". Why? Because the default when adding a new parameter is as follows:

Parameter name is unrecognized.

The default parameter name is "NewParameterName". Therefore, in our example , we have customized it to "ComputerName". And, consequently, we use it in our SQL query as "@ComputerName".
However , we receive the following error : "Parameter name is unrecognized." :


  fix  SSIS error :  Parameter name is unrecognized.


According to MSDN Documentation, while using SQL the parameters must be named as follows:


Therefore we must change our SQL query to complain to those directives, and use the "?" marker :

 How to fix the SSIS error :  Parameter name is unrecognized. 1


Now, the parameters must be mapped to the query, indexed on base "0" .
In our example, we have 4 "?" markers: therefore we add 4 parameters indexed from "0" to "3" :

SELECT  
CAST(
CASE
      WHEN ?  - ? <= 0  
         THEN 0
      WHEN ?  - ? > 0   
         THEN   1
     
      ELSE -1
      END
      
AS FLOAT
)

AS  RESULT

 How to fix the SSIS error :  Parameter name is unrecognized.   2


We hope this example will be useful to you.

Happy programming.....

      by Carmel Schvartzman


כתב: כרמל שוורצמן

Sunday, February 15, 2015

#1 - How to Install SQL Server 2012 Express

In this article we describe How to Install SQL Server 2012 Express,  viewing step by step the SQL Server Setup of the free SQL Server 2012 Express version .
The SQL Server Setup can be a bit tricky, because of the many options that we must be very careful to set :
How to Install SQL Server 2012 Express


How to Install SQL Server 2012 Express


How to Install SQL Server 2012 Express      1


Once there, click the Download button, to begin the Setup:
How to Install SQL Server 2012 Express      2


There, select the upper option - "Stand alone Installation". On the next dialog, check the "I Accept..." option:

How to Install SQL Server 2012 Express      3


The next dialog should remain untouched, and click "Next" to proceed: 


How to Install SQL Server 2012 Express    4

The next window shows all available features at the Express SQL Server version. Here you will select all options available:

How to Install SQL Server 2012 Express    5

The "Management Tools" installs the Sql Server Management Studio (SSMS) , and this is a very important feature that you will need to manipulate the data, develop queries, create user defined functions (UDFs) , Procedures, Views, Tables, columns, and so on.

The next dialog allows us to specify the SQL Server Instance name. The "Default" instance is "localhost". However, the recommended settings for the Instance are the "Named Instance" option:

How to Install SQL Server 2012 Express      6

This way, if we call the Instance "SQLExpress", this will allow another instances to run on the same machine.
The way to set the Connection String at your AppSettings or web.config file, will be "localhost//SQLExpress".
The next dialog is about the Services that SQL Server needs to run. This allows to set passwords or to change the Startup Type for the two Services. Leave the default settings as they are:

How to Install SQL Server 2012 Express       7

The next dialog is about Authentication. Usually , the authentication mode is the Windows Authentication mode. The recommended settings are, to merge the Windows Authentication  mode to SQL Server Authentication. This is made by specifying a password for the System Administrator , which in SQL Server is called "sa" (System Administrator"). Try to choose a strong password, since this User is very powerful, and can make everything at SQL:

How to Install SQL Server 2012 Express     8


Next step in the SQL Setup is the Error Reporting, in which you can opt for sending to Microsoft error reports from your machine, automatically. Select it if you wish:

How to Install SQL Server 2012 Express     9

Clicking the "Next" button will trigger the installation :

How to Install SQL Server 2012 Express     10

Finally, if everything went fine, you'll be prompted with the info about all features installed on your machine:

How to Install SQL Server 2012 Express   11


That All!!!   In this article we learned Step by Step How to Install and Setup SQL Server 2012 Express
Happy programming.....

      by Carmel Schvartzman


כתב: כרמל שוורצמן