By Carmel Schvartzman
Concerning the Model in a MVC application, there are two kinds of errors that can happen: data type errors or bussiness logic errors. While the data type errors are usually handled using Data Annotations, the later are usually handled in special classes which extend the DAL of the application. Remember that when you use the Entity Framework as the DAL (Data Access Layer) of your MVC, every time you update the conceptual data model to reflect changes made to the data store, the Model classes are regenerates by a tool, meaning that everything that's in it is erased and rewriten. Therefore the Bussiness Rules are usually coded in partial classes which extend the Model classes.
The Bussiness Logic comprehends both Application Logic (the logic of the interaction between the user and the specific application we developed - web win etc) and Data Store Logic (the logic concerning exclusively the data, no matter which kind of application you have).
The Application Logic will usually be on the Controllers, because it concerns to the specific application, an MVC app in our case.
The Bussiness Data Logic MUST BE located in the Model, in a separate BLL (Bussiness Logic Layer) folder, and usually is coded in partial classes which extend the DAL (Data Access Layer) created for example by the Entity Framework.
In this tutorial we'll create a BLL (Bussiness Logic Layer) coding partial classes which extend the DAL (Data Access Layer). Let's say we have an MVC 4 app connected to an SQL SERVER database with the following tables on it:

We'll state that the user can save temporarily a comment with a Title but no text, or with a Text but no Title. But it is not allowed to save a comment without text and without title. This is a Bussiness Data Logic rule, which we'll code in an extension of the corresponding Comments Entity.
Focus the Model folder and create a new class on it. Inside, code the extension of the Comment class which we want to enable to apply our Bussiness rule:

Add a MetaData class named CommentMetaData, as we did in a previous tutorial , in order to enable Data Type Validation:

Next, do the Comment class to implement the IValidatableObject:

This way will allow us to code a Validate() method to perform the necessary bussiness logic on our entity, returning an IEnumerable collection holding all input errors.
Add the Validate method with its returned ValidationResult collection:

Finally, code the required if clause stating that we wont persist an user comment only in case of the lack of both Title and Text:

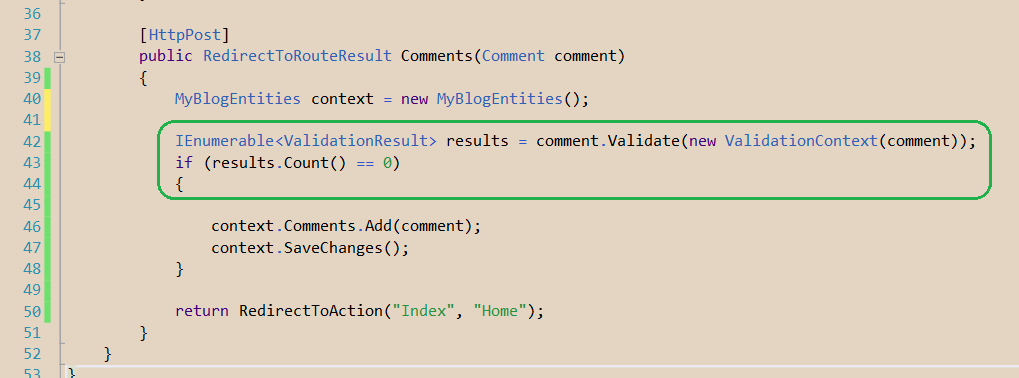
Now let's make use of the IValidatableObject: provided that you already have a form where the user will type her/his comment. If you don't, referer to this tutorial . Go to the Home Controller and find the method which handles POST requests:
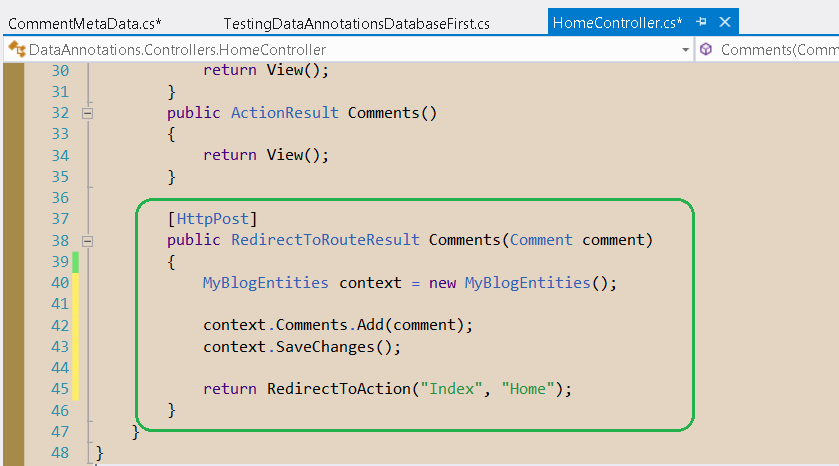
There, add an if clause using our Validate() method, which IEnumerable results count will be 0 only in case of valid input:
Open the Comment's form and save two comments, the first having only a Title but no text, the second having Text but no Title:


Now check the database to see the persisted records:

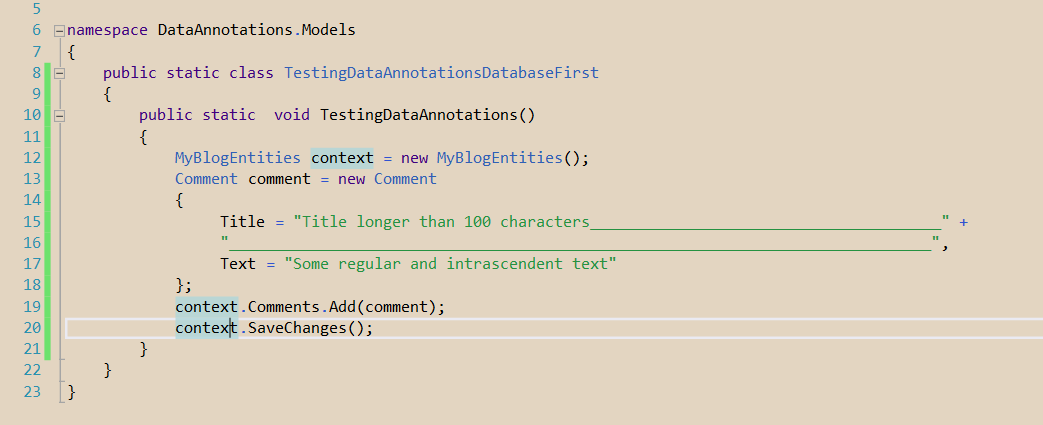
Then try to persist a Comment with no Title nor Text:

The comment has not been saved, because our extended Comment entity didn't allow that.
To see it from inside, set a breakpoint in the Validate() method, and try to save an empty Comment again. You'll see that the runtime enters the if clause , avoiding saving the record:

That's all!! The Bussiness Logic comprehends both Application Logic (the logic of the interaction between the user and the specific application we developed - web win etc) and Data Store Logic (the logic concerning exclusively the data, no matter which kind of application you have).
The Application Logic will usually be on the Controllers, because it concerns to the specific application, an MVC app in our case.
The Bussiness Data Logic MUST BE located in the Model, in a separate BLL (Bussiness Logic Layer) folder, and usually is coded in partial classes which extend the DAL (Data Access Layer) created for example by the Entity Framework.
In this tutorial we'll create a BLL (Bussiness Logic Layer) coding partial classes which extend the DAL (Data Access Layer). Let's say we have an MVC 4 app connected to an SQL SERVER database with the following tables on it:
We'll state that the user can save temporarily a comment with a Title but no text, or with a Text but no Title. But it is not allowed to save a comment without text and without title. This is a Bussiness Data Logic rule, which we'll code in an extension of the corresponding Comments Entity.
Focus the Model folder and create a new class on it. Inside, code the extension of the Comment class which we want to enable to apply our Bussiness rule:
Add a MetaData class named CommentMetaData, as we did in a previous tutorial , in order to enable Data Type Validation:
Next, do the Comment class to implement the IValidatableObject:
This way will allow us to code a Validate() method to perform the necessary bussiness logic on our entity, returning an IEnumerable collection holding all input errors.
Add the Validate method with its returned ValidationResult collection:
Finally, code the required if clause stating that we wont persist an user comment only in case of the lack of both Title and Text:
Now let's make use of the IValidatableObject: provided that you already have a form where the user will type her/his comment. If you don't, referer to this tutorial . Go to the Home Controller and find the method which handles POST requests:
There, add an if clause using our Validate() method, which IEnumerable results count will be 0 only in case of valid input:
Open the Comment's form and save two comments, the first having only a Title but no text, the second having Text but no Title:
Now check the database to see the persisted records:
Then try to persist a Comment with no Title nor Text:
The comment has not been saved, because our extended Comment entity didn't allow that.
To see it from inside, set a breakpoint in the Validate() method, and try to save an empty Comment again. You'll see that the runtime enters the if clause , avoiding saving the record:
Happy programming.....
כתב: כרמל שוורצמן