Showing posts with label XML. Show all posts

Monday, September 15, 2014

Step by step how to design a RESTful WCF Service inside an Asp.Net MVC application


In this article we'll create a WCF RESTful service inside an Asp.Net MVC application , with support for all CRUD operations (Create - Retrieve - Update - Delete), handling the HTTP GET, PUT , POST & DELETE verbs
For this tutorial, we'll  create a WCF RESTful application that will handle HTTP POST - HTTP PUT & HTTP DELETE requests.  A simpler tutorial including only HTTP GET  requests can be found HERE.
The REST architecture relies upon handling HTTP requests according to this methods : GET for reading data, POST for creating a new record, PUT for updating ALL the fields of a record, MERGE (or PUT again) for updating just part of the fields of some record, and DELETE for removing a record.
We'll see the data modifications at an MVC application, which will use an SQL database represented by the Entity Data Model EDM, showing as follows:


We'll add to that MVC application a WCF Web Service to fetch and preserve data & render it in JSON format.
Now add a new item to your project :

Search for all WCF items, and select AJAX-enabled WCF :


Open the web.config created: you'll recognize an ENDPOINT BEHAVIOUR to enable Web Script , that means, AJAX jquery calls, and a webHttpBinding  (for REST purposes)  ENDPOINT linked to a CONTRACT named "BlogService" :


The "<enableWebScript>" allows our RESTful WCF service to be accessed through AJAX calls, and this option includes also the "<WebHttp>" directive, which transforms the WCF service in RESTful, based on HTTP verbs which determine the CRUD operation to perform (PUT for update, POST for create, GET for  retrieve, DELETE for remove).
Because at the present we don't want the RESTful WCF service to handle AJAX requests, we'll replace it with the  "WebHttp" directive in the Endpoint Behavior:
Here i added a Service Behavior just to see the errors , but you can delete the behavior if you want.

Because we are inside an MVC application, we must tell MVC to ignore the route to the WCF: add this code to the RouteConfig.cs  file, at the "App_Start " folder:


Open that "BlogService" class : it have got an SERVICE CONTRACT attribute :


Delete the function , and create our own Service Contract with this Interface for ALL CRUD operations:

[ServiceContract(Namespace = "")]
    public interface IBlogService
    {
        [OperationContract]
        [WebGet(ResponseFormat = WebMessageFormat.Json)]
        List<Blog> GetPosts();
        [OperationContract]
        [WebGet(ResponseFormat = WebMessageFormat.Json)]
        Blog GetPost(string Id);
        [OperationContract]
        [WebInvoke(Method = "POST",
            RequestFormat = WebMessageFormat.Json,
            ResponseFormat = WebMessageFormat.Json)]
        bool CreatePost(Blog post);
        [OperationContract]
        [WebInvoke(Method = "PUT",
            RequestFormat = WebMessageFormat.Json,
            ResponseFormat = WebMessageFormat.Json)]
        bool UpdatePost(Blog post);
        [OperationContract]
        [WebInvoke(Method = "DELETE",
            RequestFormat = WebMessageFormat.Json,
            ResponseFormat = WebMessageFormat.Json)]
        bool RemovePost(Blog post);
    }


Notice we serialize the data to JSON using the Request/Response Format. Also, we set the "WebInvoke" to POST, PUT & DELETE. And the return of the web HTTP GET methods is a LIST<> or a Blog object, always in JSON format.

Now we implement the Service Contract with the following class:

[AspNetCompatibilityRequirements(RequirementsMode = AspNetCompatibilityRequirementsMode.Allowed)]
    public class BlogService : IBlogService
    {
        BlogEntities ctx;
        public BlogService()
        {
            ctx = new Models.BlogEntities();
            ctx.Configuration.ProxyCreationEnabled = false;
        }
        public List<Blog> GetPosts()
        {
            List<Blog> data = ctx.Blogs.ToList();
            return data; 
        }

        public Blog GetPost(string Id)
        {
            int id = Convert.ToInt32(Id);
            Blog data = ctx.Blogs.Where(b => b.BlogID == id).FirstOrDefault();

            return data; 
        }

        public bool CreatePost(Blog post)
        {
            ctx.Blogs.Add(post);
            
            return ctx.SaveChanges() == 1;
        }

        public bool UpdatePost(Blog post)
        {
            Blog oldPost = ctx.Blogs.Where(b => b.BlogID == post.BlogID).Single();
            oldPost = oldPost.Merge(post);
            ctx.Blogs.Attach(oldPost);
            ctx.Entry(oldPost).State = System.Data.EntityState.Modified;
            return ctx.SaveChanges() == 1;
        }
        public bool RemovePost(Blog post)
        {

            ctx.Entry(post).State = System.Data.EntityState.Deleted;
            return ctx.SaveChanges() == 1;
        }
    }

    public static class Utils
    {
        public static Blog Merge(this Blog post, Blog modified)
        {
            if (modified.Title != "")
            {
                post.Title = modified.Title;
            }
            if (modified.Text != "")
            {
                post.Text = modified.Text;
            }
            return post;
        }
    }

Notice we add the statement "proxycreationenabled" = false, at  the instantiation of the Entities Model. That's to avoid being faced with an exception:


That error is called "CIRCULAR REFERENCE WAS DETECTED WHILE SERIALIZING AN OBJECT OF TYPE" :


Also, notice that i coded an extension method to MERGE the original record with the updated one.

Now open the browser and test the GetPosts method:


Do the same for the GetPost method:
Now we test the RESTful WCF service with HTTP POST, PUT and DELETE requests, using Fiddler (You can learn Fiddler in this tutorial.).

We'll start with the HTTP POST request. Check the HTTP POST method handler; it expects an object of Blog type, that means that we'll send a POST request containing an JSON object (as specified at the Operation Contract, inside the interface) using Fiddler. WCF will automatically try to bind the JSON object to the Blog object, according to the field names:


Type the URL with the service name and the operation name, and select the "POST" method from the list:

Also, set a Content-Type as "application/json". The Content-Length is filled by Fiddler. Insert a breakpoint at the WCF to see the binded Blog post:


Then you can see the response at Fiddler:


Next, we'll test the WCF with an HTTP PUT request. At the Fiddler Composer, enter the URI and select
 the "PUT" option:

Here is very important to send to the WCF web service the ID of the entry to update, together with the fields to change. Take care to respect the JSON notation : { "key":"value" ,  "key":"value" }
At the WCF operation, set a breakpoint:


 The second line of code contains a call to the Merge() extension method, which checks for every modified field and updates it at the original object:

As you see, the old entry has been modified:


We attach the modified entry to the context, and set the state as "modified":

Then Fiddler gets the response:


We could also have sent a response containing an "OK" or "CREATED" status, as follows:

        return new HttpResponseMessage(HttpStatusCode.OK);
        return new HttpResponseMessage(HttpStatusCode.Created);

Just change the return type from bool to HttpResponseMessage.
In case of problem we could send this instead:

      return new HttpResponseMessage(HttpStatusCode.BadRequest);
      return new HttpResponseMessage(HttpStatusCode.NotFound);


Finally, we'll remove an entry. All that the operation does is to set the state as "deleted", so that SaveChanges() will erase it from database:


Create the HTTP request at Fiddler, as before, but selecting "DELETE" :


Take care of sending the ID of the entry to remove. Rest of the fields are just optional, you don't need to set them:

As you can see at the Headers, the HTTP DELETE got a response of "true":


Again, we could also have sent a response containing an "OK" status, as follows:

        return new HttpResponseMessage(HttpStatusCode.OK);        

Just change the return type from bool to HttpResponseMessage.

We have tested our RESTful WCF service.
You can see more about sending HTTP requests from Fiddler in this tutorial.

That's all
In this post we've seen how to create a WCF RESTful service with support for all CRUD operations in Asp.Net MVC in 15 minutes. 

Happy programming.....
    By Carmel Shvartzman
כתב: כרמל שוורצמן

Wednesday, August 20, 2014

Step by step OData REST Service with MVC Web API


In this article we'll create an OData RESTful Service using the WebAPI  inside an Asp.Net MVC application , with support for GET operations. A wider  tutorial about how to create a Web API OData v4.0 Service with support for all the CRUD operations (Create - Retrieve - Update - Delete), can be seen here 

For this tutorial, we'll  create a Web API and enable it as a RESTful OData application, to handle HTTP  GET requests.   
We'll create our RESTful OData Web API from scratch in 3 simple steps:
1) create an MVC app & install/update Web API and OData assemblies
2) create the data Model;
3) create an ApiController and set the "Queryable" attribute over the Action Methods

The REST architecture enables handling HTTP requests according to several verbs: GET is for reading data, POST is for creating a new record, PUT is for updating ALL the fields of some record, PATCH (or PUT again) is for updating partially some record, and DELETE is for erasing a record.

At this example we'll use an XML file where the data is stored, and we'll expose it using the OData protocol, supporting of course sorting ($orderby)  and paging ($skip & $top) :


1) Step #1 : create an MVC app & install/update Web API and OData .dlls:

First, create a new EMPTY Asp.Net MVC Application:


Then, UPDATE the Web API references, by opening the NuGet Console and typing :
Update-Package Microsoft.AspNet.WebApi -Pre


Next, install the OData package by typing:
Install-Package Microsoft.AspNet.WebApi.OData -Version 5.0.0


2) Step #2 : create the data Model : 


 public class Note
    {
        public int ID { get; set; }
        public string To { get; set; }
        public string From { get; set; }
        public string Heading { get; set; }
        public string Body { get; set; }
        public Note()
        {

        }
        public Note(int ID, string To, string From, string Heading, string Body)
        {
            this.ID = ID;
            this.To = To;
            this.From = From;
            this.Heading = Heading;
            this.Body = Body;
        }
    }

Important: you MUST declare a parameterless constructor in your model, because the serializer will need it to render the data at the Controller.

3) Step #3 : create an ApiController and set the "Queryable" attribute over the Action Methods : 


Why do we mark the Action Method as "Queryable"? That's the key to enable the OData HTTP Service: Take a look at the attribute's description:


Important:   The Action method's name MUST be set according to the HTTP verbs : Get for HTTP GET, Post for HTTP POST, and so on.

Now we get the data from the XML file, and return an IQueryable<> collection :
public class NotesController : ApiController
    {
        [Queryable]
        public IQueryable<Note> Get()
        {
            List<Note> data = new List<Note>();
            XDocument xdoc = XDocument.Load(HttpContext.Current.Server.MapPath("/App_Data/data.xml"));
            foreach (var note in xdoc.Descendants("note"))
            {
                data.Add(new Note(
                    Convert.ToInt32(note.Descendants("id").FirstOrDefault().Value),
                    note.Descendants("to").FirstOrDefault().Value,
                    note.Descendants("from").FirstOrDefault().Value,
                    note.Descendants("heading").FirstOrDefault().Value,
                    note.Descendants("body").FirstOrDefault().Value
                    ));
            }
            return data.AsQueryable<Note>();
        }
    }

At the code above, i remarked the most important points with red .

Finally, we set the route template at the WebApiConfig file :

That's all. Build & run the service :
Make a HTTP GET request using the OData protocol :


As you see, we have paging ($skip & $top) and sorting ($orderby) support : 


That's all
In this post we've seen how to setup an OData RESTful HTTP Service using the Web API  inside an Asp.Net MVC application , with support for GET operations. 

Happy programming.....
    By Carmel Shvartzman
כתב: כרמל שוורצמן

Wednesday, August 13, 2014

Singleton Data Repository - Gang of Four Singleton Pattern Simple Sample


In this article we create a singleton Data Repository for MVC. A Singleton class is a class of which only a single instance can exist: is one of the 23 software patterns by the Gang of Four. The Singleton Pattern become really useful in an MVC application, because instead of re-creating the Repository 1) each time a request comes to the MVC app, and 2) also for every different user which browser to the site, it is created ONLY ONE time and kept for the whole lifetime of the MVC application, that means, until the IIS application pool is reset.
First i give you the whole c# code to create a Singleton Data Repository for Asp.Net MVC. It will be  connected to a single XML file , and will be exposing all CRUD operations, using the XDocument class. The basic class will be "Message", and the Repository , "IMessagesRepository". The initial XML file is placed at the end of this post, if you want to use it as bootstrap.
After giving you the Repository code for COPY-PASTE, we'll explain how it works, and we'll compare its behavior with a non-singleton MVC application.

  The whole application can show as follows (i'm using the Twitter Bootstrap: HERE you have a tutorial for installing it in 5 minutes):


This is the code for the Singleton Data Repository. Just COPY-PASTE it in your Models folder and use it inside the Controller: 


namespace RichFormApplication.Models
{

    public class Message
    {
        public int ID { get; set; }
        public string To { get; set; }
        public string Sender { get; set; }
        public string Title { get; set; }
        public string Contents { get; set; }
    }


    public interface IMessagesRepository
    {
        IEnumerable GetAll();
        Message Get(int id);
        Message Add(Message item);
        bool Update(Message item);
        bool Delete(int id);
    }


    public class MessagesRepository : IMessagesRepository
    {
        static private int test;
        private List<Message> Messages = new List<Message>();
        private int iNumberOfMsgs = 1;
        private XDocument doc;

        #region Singleton Init
        private static MessagesRepository _RepositoryInstance = new MessagesRepository();
        public static MessagesRepository RepositoryInstance
        {
            get
            {
                test = 1;
                return _RepositoryInstance;
            }
        }
        #endregion

        private MessagesRepository()
        {
            doc = XDocument.Load(HttpContext.Current.Server.MapPath("~/App_Data/data.xml"));
            foreach (var node in doc.Descendants("note"))
            {
                Messages.Add(new Message
                {
                    ID = Int32.Parse(node.Descendants("id").FirstOrDefault().Value),
                    To = node.Descendants("to").FirstOrDefault().Value,
                    Sender = node.Descendants("from").FirstOrDefault().Value,
                    Title = node.Descendants("heading").FirstOrDefault().Value,
                    Contents = node.Descendants("body").FirstOrDefault().Value
                });
            }

            iNumberOfMsgs = Messages.Count;
        }

        public IEnumerable GetAll()
        {
            return Messages;
        }
        public Message Get(int id)
        {
            return Messages.Find(p => p.ID == id);
        }
        public Message Add(Message item)
        {
            if (item == null)
            {
                throw new ArgumentNullException("item");
            }

            item.ID = iNumberOfMsgs++;

            XElement newNode = new XElement("note");
            XElement id = new XElement("id"); id.Value = item.ID.ToString();
            XElement to = new XElement("to"); to.Value = item.To;
            XElement from = new XElement("from"); from.Value = item.Sender;
            XElement Title = new XElement("heading"); Title.Value = item.Title;
            XElement Contents = new XElement("body"); Contents.Value = item.Contents;
            newNode.Add(id, to, from, Title, Contents);
            doc.Root.Add(newNode);
            SaveToXML();
            return item;
        }
        public bool Update(Message item)
        {            
            XElement Message = doc.Descendants("Message").Where(n => Int32.Parse(n.Descendants("id").FirstOrDefault().Value) == item.ID).FirstOrDefault();
            Message.Descendants("to").FirstOrDefault().Value = item.To;
            Message.Descendants("from").FirstOrDefault().Value = item.Sender;
            Message.Descendants("heading").FirstOrDefault().Value = item.Title;
            Message.Descendants("body").FirstOrDefault().Value = item.Contents;
            SaveToXML();
            return true;
        }
        public bool Delete(int id)
        {
            doc.Root.Descendants("note").Where(n => Int32.Parse(n.Descendants("id").First().Value) == id).Remove();
            SaveToXML();
            return true;
        }

        private void SaveToXML()
        {
            doc.Save(HttpContext.Current.Server.MapPath("~/App_Data/data.xml"));
        }
    }
}

Take a look at the red code : the steps for creating the Singleton are:
1) change the "public" for a "private" constructor;
2) declare a "public static" property which returns an INSTANCE of the class
3) that static instance will be created by the .Net CLR runtime , at the private static field containing the
         instance, at the precise instant in which someone calls at least one of the properties or methods
         of the class. The static instance of the class will survive for all lifetime of the MVC application.

To use the Repository just type the following code in the Controller:

        public ActionResult Index()
        {
            return View(MessagesRepository.RepositoryInstance.GetAll());
        }

Now let's test the singleton: browse to the website and put in debugger two breakpoints inside the Repository:


There is no initialization of the Repository , as it is static and its constructor is private.
You'll see that the first time some user browse to the site, the repository is initialized:


Try a second time, refreshing the web page: the repository will not be created again, because it already exists:


Try now as a new user, opening a second session in another browser tab, to see that you keep using the same repository as the first user does.

This is the XML initial file:


<?xml version="1.0" encoding="utf-8"?>
<notes>
  <note>
    <id>0</id>
    <to>Fry</to>
    <from>Leela</from>
    <heading>Reminder</heading>
    <body>Don't forget me this weekend!!!</body>
  </note>
  <note>
    <id>1</id>
    <to>Leela</to>
    <from>Fry</from>
    <heading>Finally!!!</heading>
    <body>Leela, have you asked permission from the Professor?</body>
  </note>
  <note>
    <id>2</id>
    <to>Fry</to>
    <from>Leela</from>
    <heading>Rejection</heading>
    <body>You know what? In second thoughts, i'm going out with Lars this weekend. Sorry...</body>
  </note>

</notes>

That's all concerning to the Singleton Repository.

If you are asking yourself about the XML related code, some relevant points about the XML include:
 We are using the Descendants("") method and the Load() method, for reading the XML file into memory and then inside the List<>.
The Get methods use Find(p => p):


To add a new node, we CREATE an XElement with all its XElement CHILDREN , and then add it to the ROOT (be careful adding them to the root) of the XDocument:


That's all!!  
Happy programming.....
        By Carmel Schvartzman
כתב: כרמל שוורצמן

Wednesday, August 6, 2014

Building Blocks: XML Data Repository for Asp.Net MVC with all CRUD Operations

The following code is the complete C# code to create an XML Data Repository for Asp.Net MVC with all CRUD Operations  , connected to a single XML file , and exposing all CRUD operations, everything using XDocument. The base class is "Note", and the Repository is "INotesRepository". A little XML bootstrap file is at the end of this post.
This code can also be downloaded from the following GitHub repository:
https://github.com/CarmelSoftware/MVCDataRepositoryXML
The whole application can show as follows:
Building Blocks: XML Data Repository for Asp.Net MVC with all CRUD Operations


Just COPY-PASTE it inside your Models folder and initialize it inside some Controller:


using System;
using System.Collections.Generic;
using System.Linq;
using System.Web;
using System.Xml.Linq;

namespace IoCDependencyInjection.Models
{

public class Note
{
public int ID { get; set; }
public string To { get; set; }
public string From { get; set; }
public string Heading { get; set; }
public string Body { get; set; }
}


public interface INotesRepository
{
IEnumerable
<Note> GetAll();
Note Get(int id);
Note Add(Note item);
bool Update(Note item);
bool Delete(int id);
}


public class NotesRepository : INotesRepository
{
private List
<Note> notes = new List<Note>();
private int iNumberOfEntries = 1;
private XDocument doc;

public NotesRepository()
{
doc = XDocument.Load(HttpContext.Current.Server.MapPath("~/App_Data/data.xml"));
foreach (var node in doc.Descendants("note"))
{
notes.Add(new Note
{
ID = Int32.Parse(node.Descendants("id").FirstOrDefault().Value),
To = node.Descendants("to").FirstOrDefault().Value,
From = node.Descendants("from").FirstOrDefault().Value,
Heading = node.Descendants("heading").FirstOrDefault().Value,
Body = node.Descendants("body").FirstOrDefault().Value
});
}

iNumberOfEntries = notes.Count;
}

public IEnumerable
<Note> GetAll()
{
return notes;
}
public Note Get(int id)
{
return notes.Find(p => p.ID == id);
}
public Note Add(Note item)
{
if (item == null)
{
throw new ArgumentNullException("item");
}

item.ID = iNumberOfEntries++;

XElement newNode = new XElement("note");
XElement id = new XElement("id"); id.Value = item.ID.ToString() ;
XElement to = new XElement("to");to.Value = item.To;
XElement from = new XElement("from"); from.Value = item.From;
XElement heading = new XElement("heading"); heading.Value = item.Heading;
XElement body = new XElement("body"); body.Value = item.Body;
newNode.Add(id, to, from, heading, body);
doc.Root.Add(newNode);
SaveXML();
return item;
}
public bool Update(Note item)
{
if (item == null)
{
throw new ArgumentNullException("item");
}
XElement note = doc.Descendants("note").Where(n => Int32.Parse( n.Descendants("id").FirstOrDefault().Value ) == item.ID ).FirstOrDefault();
note.Descendants("to").FirstOrDefault().Value = item.To;
note.Descendants("from").FirstOrDefault().Value = item.From;
note.Descendants("heading").FirstOrDefault().Value = item.Heading;
note.Descendants("body").FirstOrDefault().Value = item.Body;
SaveXML();
return true;
}
public bool Delete(int id)
{
doc.Root.Descendants("note").Where(n => Int32.Parse(n.Descendants("id").First().Value ) == id).Remove() ;
SaveXML();
return true;
}

private void SaveXML()
{
doc.Save(HttpContext.Current.Server.MapPath("~/App_Data/data.xml"));
}
}
}

This is the XML initial file:


<?xml version="1.0" encoding="utf-8"?>
<notes>
  <note>
    <id>0</id>
    <to>Fry</to>
    <from>Leela</from>
    <heading>Reminder</heading>
    <body>Don't forget me this weekend!!!</body>
  </note>
  <note>
    <id>1</id>
    <to>Leela</to>
    <from>Fry</from>
    <heading>Finally!!!</heading>
    <body>Leela, have you asked permission from the Professor?</body>
  </note>
  <note>
    <id>2</id>
    <to>Fry</to>
    <from>Leela</from>
    <heading>Rejection</heading>
    <body>You know what? In second thoughts, i'm going out with Lars this weekend. Sorry...</body>
  </note>

</notes>


Some important points are the XDocument utilization:
Building Blocks: XML Data Repository for Asp.Net MVC with all CRUD Operations 1
 We are using essentially the Descendants("") & the Load() methods, to read the XML document into memory and inside a List<>.
The Get method uses Find(p => p):

XML Data Repository for Asp.Net MVC with all CRUD Operations

To INSERT a new node, we CREATE an XElement with its inner XElement CHILDS , and then add it to the ROOT of the XDocument:

Data Repository for Asp.Net MVC


If you liked the look of this site, learn how to create it using open source CSS templates in this tutorial.

A Generic Data Repository is built step by step in the following Tutorial: http://themvcclub.blogspot.co.il/2014/06/generic-data-Repository-ASP.NET-MVC.html

A GitHub repository containing a Data Repository With Caching can be found here:
https://github.com/CarmelSoftware/Data-Repository-with-Data-Caching-in-ASP.NET-MVC-4

That's all!!  
Happy programming.....
        By Carmel Schvartzman
כתב: כרמל שוורצמן

Sunday, July 20, 2014

Step by step how to call a WCF Service Endpoint from both Serial and Asynchromous MVC Controller

   In this tutorial we'll learn how to call a WCF Service from both asynchronous and serial Controllers in Asp.Net MVC. We'll first build a WCF Service, and call it from a Proxy at an MVC Application. Then we'll code an Asynchronous Controller and call the same WCF service but using the async methods automatically created inside the Proxy by Visual Studio.
That way we'll compare the async and serial approaches of calling a WCF service from MVC:


Let's first of all create the WCF as an external project :


Create an Operation contract Interface as follows:
 Then implement that Interface in a class as follows:
 And define the DataContract which is contained in the WCF response:


At the MVC application, add a Service Reference:


Enter the WCF service URL or press "Discovery" :


You'll discover the only method that we declared at the WCF service:


Press OK. If you get an error as this:


That means that your MVC is running at the IIS Express or at the IIS installed at your machine, instead of running on the Developer Server that comes with Visual Studio. The difference is, the former will notice that there are 2 different applications (WCF + MVC) and hence 2 different domains, and will avoid cross-domain calls:


In order to allow cross-domain, add the following code to your web.config file at the WCF project:

<system.webServer><httpProtocol>      <!--THIS IS FOR CORS POLICY-->      <customHeaders>        <add name="Access-Control-Allow-Origin" value="*" />        <add name="Access-Control-Allow-Headers" value="Content-Type" />        <add name="Access-Control-Allow-Methods" value="POST, GET, OPTIONS" />      </customHeaders>    </httpProtocol>  </system.webServer>

After that, may be you don't have an error but you see that the Proxy has not been created at the MVC application, as follows ( you can look for the Proxy classes at the Service References folder of your project: there are supposed to be .cs files containing the methods and classes created to the dialog between the MVC and the WCF service):


Then open the WCF reference at your MVC , and select "Configure" :


There UNCHECK the "Reuse types in referenced assemplies" box:


You'll see immediatly that the Proxy has been built:


Take a look at the Proxy and , specially, at the "async" methods created:


Now add some Controller calling the WCF through that Proxy, and its respective View:


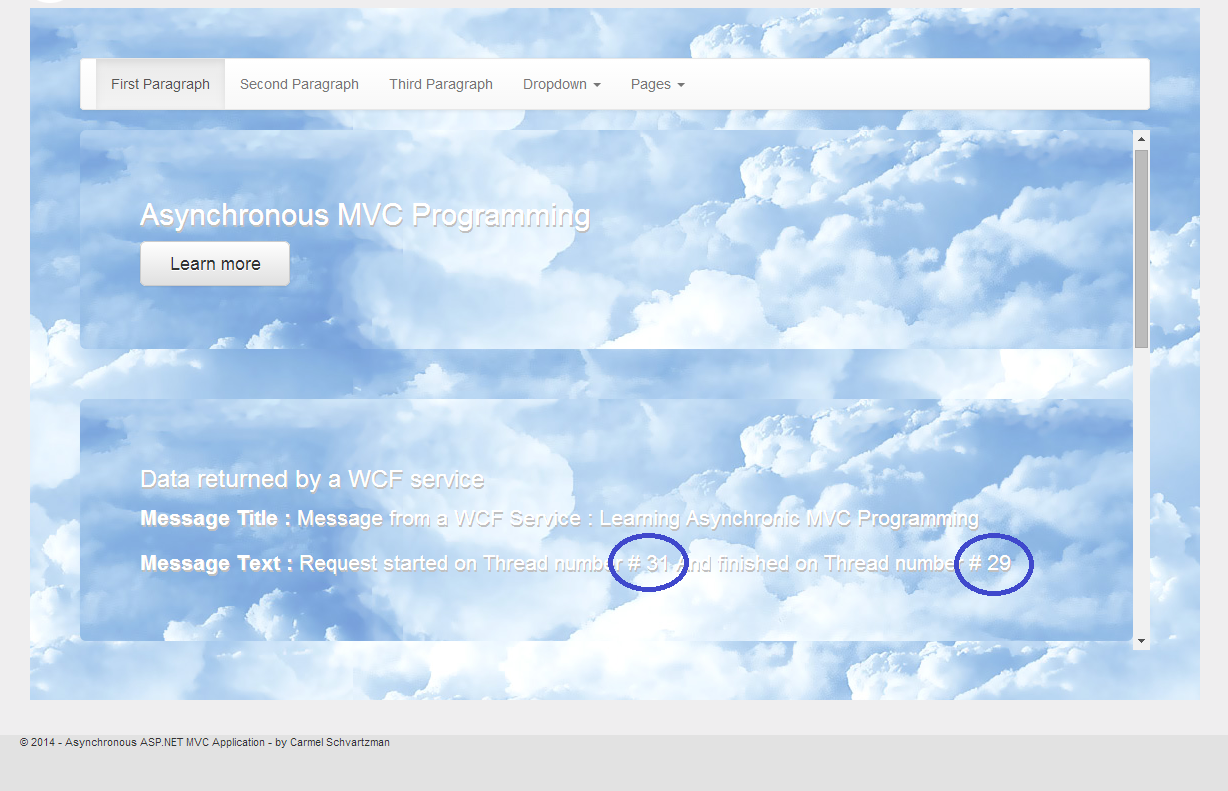
As you can see, both the request and response has been handled by the same thread:


That means, the thread has been blocked waiting for the WCF service to answer the request from the MVC Controller. In other words, if there are 1,000 users in certain moment viewing this MVC web page, the web server will have at least 1,000 threads stuck and consuming its resources while waiting for WCF.
To avoid that situation, let's convert our Controller to an ASYNCHRONOUS method, meaning that no thread will get stuck waiting now:


The only thing you have to add to your Controller is:
1) an "async" expression and a Task<ActionResult> return object,
2) the "await" expression in order to automatically declare this Controller as the callback function to be called back by the:
3) the GetMessageASYNC Proxy method .
That's all the changes. (i added also an "await Task.Delay(3000)" just to make the waiting more heavy, for the test sake). Now you can see that the thread which got the request IS DIFFERENT from the thread corresponding to the callback function which was called by the Proxy when the WCF service sent its response:


That's all!!  In this tutorial we've learned how to call a WCF Service from both asynchronous and serial Controllers in Asp.Net MVC.
Happy programming.....
      By Carmel Schvartzman
כתב: כרמל שוורצמן