Showing posts with label HttpPutAttribute. Show all posts

Saturday, November 29, 2014

Step by step how to send an HTTP PUT Request to a RESTful WCF Service using Fiddler

In this post we'll learn how to send an HTTP PUT Request to a RESTful WCF application using Fiddler
We'll use Fiddler to test an RESTful WCF application, sending an HTTP PUT request. We'll start with a working WCF application,  and we'll update an entry using Fiddler, showing as follows :
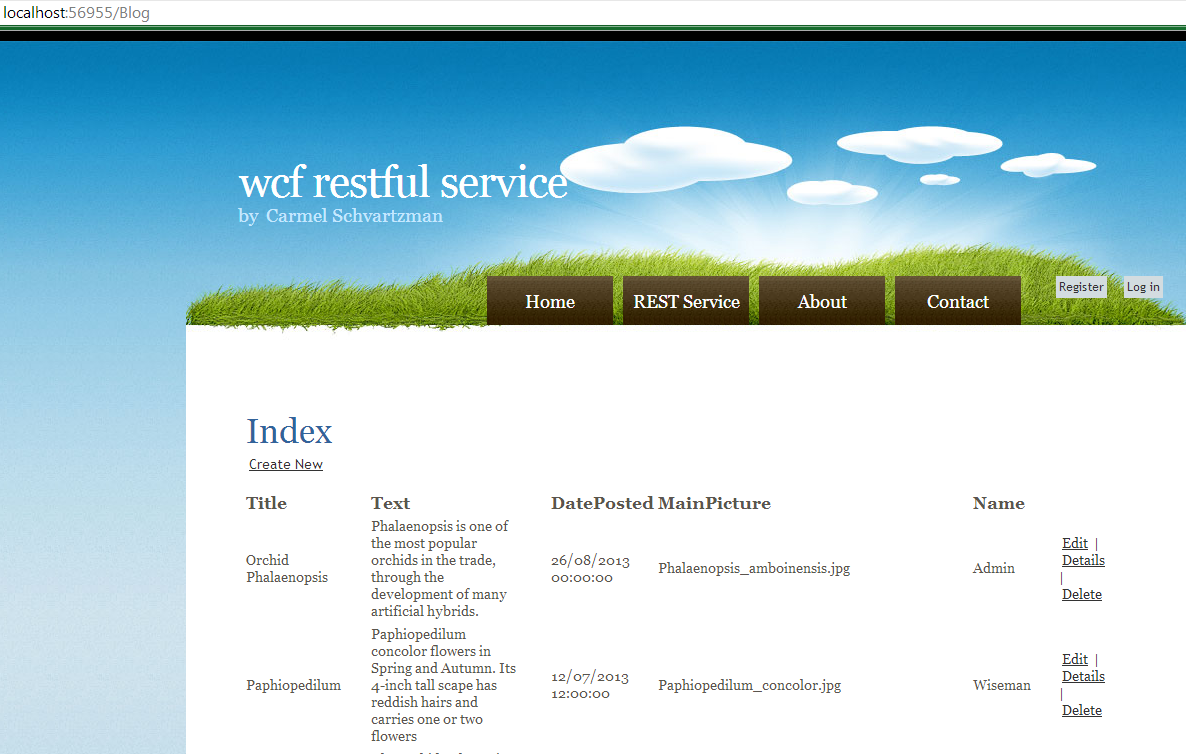


First of all, we have to download the FREE Fiddler tool from this web site :


After installing it , study the settings of the Operation Contract at the WCF Service Contract, in order to fill exactly what it is expecting as a request:
http put request to restful wcf using fiddler

The WebInvoke handles the PUT HTTP verb, and the request format must be JSON, and so the response format. Therefore, we'll send exactly what the WCF wants.
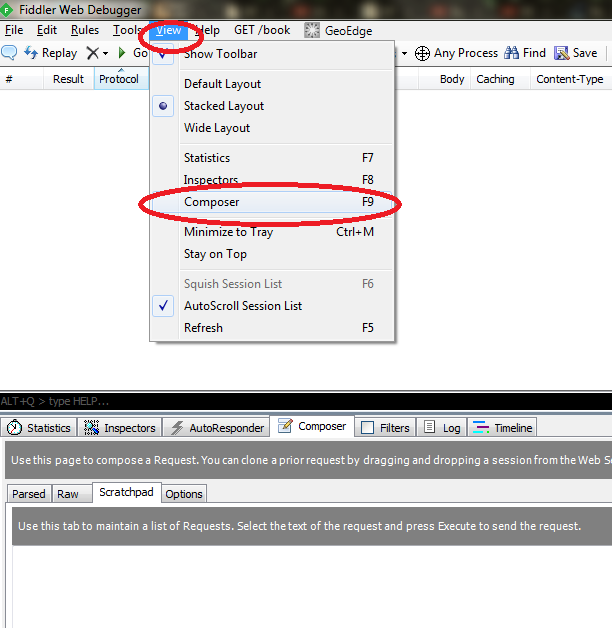
Open Fiddler and click the "Composer" option:


Then type in the URL and select "PUT" HTTP request method from the list. Also, set the request Headers as follows: (don't worry about the Content-Length, because Fiddler will fill  it for you):


Also, fill the Request Body :  be careful to fill adequately the field names of the Entity you want to update, most of all, the ID of the record to change.

Press the "EXECUTE" button at the Fiddler Composer, to send the request. If you set a breakpoint inside the WCF HTTP PUT handler, you'll see the bindings in action :


As you see, WCF succeeded at binding the JSON it got with the Blog object expected.
The response is then sent to Fiddler, with an "true" value:


And the database shows the updated values:


If you want to take a look at the RESTful WCF which we're using here, see this tutorial.

That's all... 
In this tutorial we've learned how to send an HTTP PUT Request to a RESTful WCF application using Fiddler. 
Happy programming.....
      By Carmel Shvartzman
כתב: כרמל שוורצמן


Sunday, January 12, 2014

Step By Step How to create an Action Method to Update an Item

        By Carmel Schvartzman

In this tutorial we'll learn how to code an Action Method to  Update an Item and persist it to an SQL SERVER database in ASP.NET MVC 4, in order to enable support to all CRUD (Create Retrieve Update Delete) operations in our application.
An Action method is a public method in a Controller, called in response to an user interaction. When a user send a request to an MVC app, the MVC framework find the appropriate Controller routing the request to it, and calling an Action method. This Action method returns an ActionResult object, which can be one of the following:
1. ViewResult : renders an MVC View
2. PartialViewResult : renders a section of a View
3. FileResult : returns binary data in the response
4. JsonResult : returns serialized Json object
5. JavaScriptResult : returns a script to be executed in the user browser
6. RedirectResult : redirects to another Action by URL
7. RedirectToRouteResult : redirects to another Action

There is also an EmptyResult, to return null.
Every public method in a Controller is suposed to be an Action. We can place private methods in a Controller, and if we need a public method that is not an Action, it must be decorated by an NonActionAttribute, which is translated by MVC to an 404 error (Page Not Found).

An Action method can handle different HTTP Verbs by using the AcceptVerbsAttribute, or the following more specific attributes:
1. HttpGetAttribute (for retrieving data)
2. HttpPostAttribute (for creating new entries)
3. HttpPutAttribute (for updating data)
4. HttpDeleteAttribute (for deleting)

When an Action method returns a View, we can pass data to the View using the ViewDataDictionary collection, this way:
                ViewData["Some Key"] = "Some Value";

Also , the View object supports getting any strongly-typed object as an argument:
                return View(someObject);

In the case an Action must pass data to another Action, this data is stored in a Session collection named TempDataDictionary:
               TempData["SomeKey"] = someObject;

This is useful while redirecting to another Action, or when sending a message to another Action in case of errors.


We'll add an Action Method to Update an Item and save it in a database table  in ASP.NET MVC 4 , resulting in the following Edit View :


Let's say we have an MVC app connected to a database with an Entity Framework data model. First we'll create a DataRepository which supports retrieve and create actions. Create a new class BlogRepository:


In the new class, create a property with only the "get" access modifier to worry for creating the Data Model context:

Also, make the Repository implement the IDisposable interface, in order to dispose it after use:


Code the implementation of IDisposable:


We'll need also a method for retrieving ONLY ONE post to be updated. Create the method, and first of all try to get the required post from Cache:


If the posts's Cache is empty, get the data from database and refresh the Cache:


Create a "Save" method to persist the data to the store:


And create an "Update" method to edit a post:


The code will also remove the collection from the Cache, because the cache data is now obsolete.


Now we're ready to create our Controller and its Action methods. Add a new Controller named "BlogController":


The template to be used will be "MVC Controller with empty read/write actions":


Open the new Controller and find the "Edit" Action:


Now let's add a View to render the list:


Choose creating a strongly-typed View, with the Blog Model:


The Scaffold Template must be "Edit" in this case.

The "Edit" View inside the "Blog" folder has been automatically created.
Open the new Controller and find the "Edit" Action, with "HttpPost" attribute decorating it:


Write the following code to update a post using the Repository:


Notice that we're calling Save() after creating the new post. Also notice that we replaced the parameter type of the method, to a "Blog" type, which is received from the browser through an POST request.

Now let's see how our Action method works. Debug the project (F5), and browse to the "Blog" page .
Once there, select some entry and press "Edit":


We get the "Edit" View, to input the new data for the Blog post:


Enter some input into the form, and press Save:


The post has been updated, and also it is reflected in the "Index" View, because the Cache has been refreshed:


In this tutorial we have learned how to create an Action Method to update an item in a database table  in ASP.NET  MVC 4, using a Repository with caching support.

That's all!! 
Happy programming.....


כתב: כרמל שוורצמן