Showing posts with label Blogger. Show all posts

Sunday, March 8, 2015

Upload a custom CSS3 Web Template to your Blogger's Blog


In this article we upload a custom CSS 3 web template to a Blogger's blog, to change the web site appearance, using the free CSS3 web templates elegantly and well designed by www.deluxetemplates.net/. DeluxeTemplates keeps creating excellent CSS templates since 2009, specially optimized for Blogger and for Wordpress.

Blogger offers several templates for your Blog, but also offers the flexibility of accepting your custom CSS template, if you found that the default templates are not enough. Blogger accepts uploading your custom CSS template, provided it is an XML file which complies with special tags used by Blogger to display menus and widgets:


To setup your template, browse to your Blog and open the "Template" tab:


upload-custom-css-template-to-blogger

There you'll see the default templates:


Locate the "Backup/Restore" button and click it:


First & very important: if you have a fairly good template installed, BACKUP it downloading the template:

Next we get an elegant CSS3 template web site from "DeluxeTemplates", browsing to the "Blogger" templates, where you can find Personal, bussiness, Tech, Music, and more templates' categories:


Select your template and download it:


Open the ZIP file, and you'll see several links to pages answering the FAQ questions, and also one XML file:


Select the XML file and upload it:

And that's it!! Just open your Blog to see the new CSS style & design:


That's all!!!!
In this post we've learned step by step how to upload a custom CSS 3 web template to a Blogger's blog, to change the web site appearance, using the free CSS3 web templates elegantly and well designed by www.deluxetemplates.net/. If you like to learn a some more customized design, you can  learn using the Twitter Bootstrap in this short tutorial. The 5 minutes Twitter Bootstrap installing instructions are here . Easy CSS3 graphical explanations for beginners can be found here.
Enjoy coding.....

By Carmel Shvartzman

עריכה: כרמל שוורצמן

Wednesday, September 3, 2014

How to add the Google Fonts you like to a Blogger's Blog

In this article we review how to add your preferred Google Fonts to your Blogger's Blog.
Let's say we have a post we want to customize with our most liked font. As to the date, Google Fonts have more than 600 different fonts to choose from.
For example, i'd like to produce the following cursive paragraphs as remarked here in green:


First, open the Google's Font wizard at http://www.google.com/fonts:


Here, just select the font's families you want, and press "Add to Collection". Then select the styles you want, and notice that this will have some performance cost in milliseconds for the load of your blog. The "clock" must preferably be at green or orange to be cheap in terms of performance :


Now you have to copy-paste some HTML & CSS. The HTML is the reference to the fonts.googleapis.com where the fonts are stored, and the CSS must be set at the <div>s where you want to change the font family:

Add Google Fonts  to a Blogger's Blog

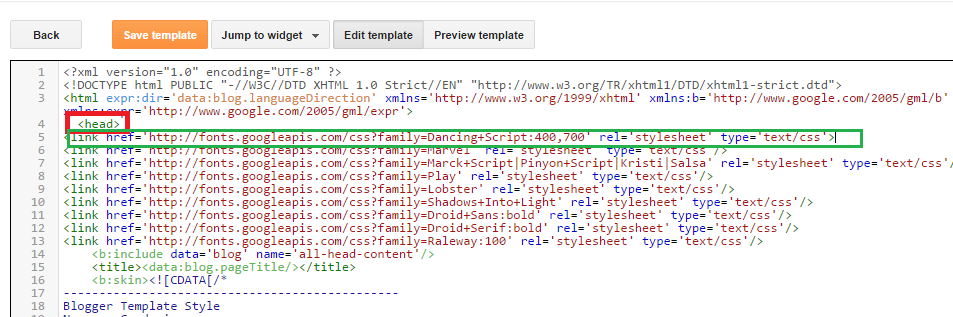
Go to your Blogger's Blog and open the Template's tab. Then click on "Edit HTML". Find the <HEAD> of the HTML, and paste the HTML you copy from the Google Fonts page:


Try to save the template. You will find an error while saving the blog template, saying that "Error parsing XML" ... "the element type 'link' must be terminated by the matching end-tag </link>":

So just write that end-tag " /> ". That's all.
Save the template. Now you have a new font that you can use in your posts.
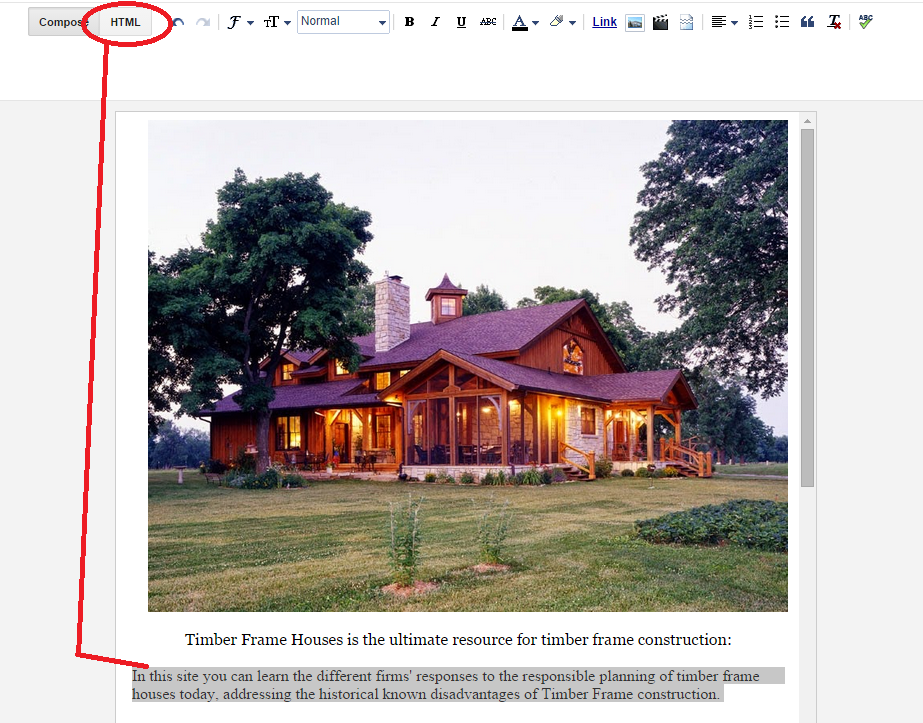
For example, open some post in HTML display, and select the <div> where you want to change the font:


Locate the corresponding <div> and get ready to add code to the "style" attribute of the <div> tag:


Paste the style that was automatically created at Google's Font page:


You will not see the new font at the Blogger editor. To see it, you will have to open your blog.
Browse to your blog and open the post, to see the custom font you added:


Changing the Default Font of the Blogger Blog:

That's all!!!! The same way, you could change the styles of titles, menus, etc, by changing the font FAMILY at the blog template.
For example, you can set some Google Font as the DEFAULT font for your entire web site, as follows: open the "Edit HTML" of your template, and search the style for "post-body" :
There paste the style that you copy from the Google Fonts wizard ("font-family:....").


Changing the Blogger Post's  Title Font:

The Post's title is inside an <h3> HTML tag, so search "post h3": 

Then paste the font family style. That's all!!

In this post we've learned step by step how to add your preferred Google Fonts to your Blogger's Blog., to customize the web site fonts, changing the CSS3 styles. For another CSS3 customization  optimized to make your web site responsive for mobile devices, you can learn using the Twitter Bootstrap in this short tutorial. A 5 minutes Twitter Bootstrap installing instructions are here . More easy CSS3 step by step graphical explanations for beginners can be found here.


By Carmel Shvartzman


עריכה: כרמל שוורצמן