By Carmel Schvartzman
In this tutorial we'll learn how to create an MVC 4 Controller in ASP.NET MVC.
An MVC application is based on the Model View Controller Architecture Pattern, a Software Pattern which separates an application in three components:
Model - containing the Bussiness Data Logic and the Data Model Validation rules.
Controller - containing the Input or Application Logic to interact with the user
View - containing the UI Logic
That means, the Controller is the one who decides whether to render certain view to the user, is the responsible for fetching and persisting data via the Model and its Data Repository, or everything else concerning Views and Model. All this is done using Action Methods.
In an MVC app, a special HTTP Module named UrlRoutingModule parse and routes every request to the appropriate Controller's Action method, according to the following pattern:
http://server/Controller/ActionMethod/QueryArguments
All Controllers names must end with the suffix "Controller". The Controller class inherits from ControllerBase, and essentially is responsible for performing the following tasks:
1) Getting the values the user input
2) Deciding which Action method to call , passing it the values from the input
3) Deciding which View must be rendered
4) Handling any errors that may occur inside the Action methods
To create a new Controller, open Visual Studio , and click FILE > New Project. There, select "ASP.NET MVC 4 Web Application" , type a name and choose a location for the project:

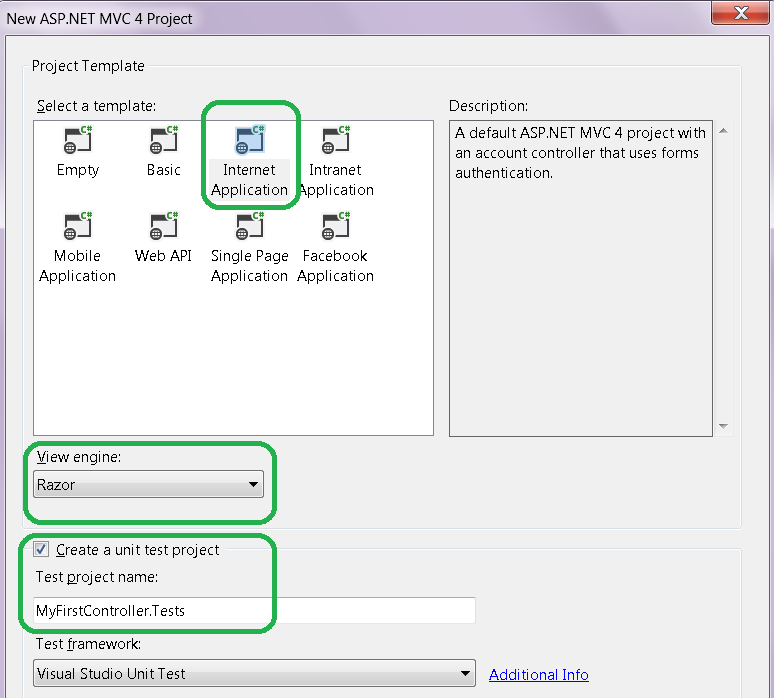
Then, select " Internet Application" as the Template to use, and "Razor" as the View Engine. Also check the "Create a Unit Test Project" option:
Go to the Solution window and find the "Controllers" folder:

Then click "Add" and select "Controller":

You get the following dialog:

Type "MyController" (must be a single word and must use the "Controller" suffix) , and from the Scaffolding list select "MVC Controller with empty read/write actions":

We got the following Controller containing the action methods for read and write data from a database:

In this Controller, we got 8 Action methods: 5 are meant to render a View for the following actions: Create, Retrieve, Update and Delete, and also a special View for displaying the Details:


In addition, we got another 3 Action methods which handle the HTTP POST requests, one for Create requests which contain the data to create an entity:

Another for Editing an existing Entity, with updated data from the user:

And a last one for deleting an Entity:

This way we created our first Controller with Action methods to perform all CRUD (Create Retrieve Update Delete) Operations.
That's all!!
Happy programming.....
An MVC application is based on the Model View Controller Architecture Pattern, a Software Pattern which separates an application in three components:
Model - containing the Bussiness Data Logic and the Data Model Validation rules.
Controller - containing the Input or Application Logic to interact with the user
View - containing the UI Logic
That means, the Controller is the one who decides whether to render certain view to the user, is the responsible for fetching and persisting data via the Model and its Data Repository, or everything else concerning Views and Model. All this is done using Action Methods.
In an MVC app, a special HTTP Module named UrlRoutingModule parse and routes every request to the appropriate Controller's Action method, according to the following pattern:
http://server/Controller/ActionMethod/QueryArguments
All Controllers names must end with the suffix "Controller". The Controller class inherits from ControllerBase, and essentially is responsible for performing the following tasks:
1) Getting the values the user input
2) Deciding which Action method to call , passing it the values from the input
3) Deciding which View must be rendered
4) Handling any errors that may occur inside the Action methods
To create a new Controller, open Visual Studio , and click FILE > New Project. There, select "ASP.NET MVC 4 Web Application" , type a name and choose a location for the project:
Then, select " Internet Application" as the Template to use, and "Razor" as the View Engine. Also check the "Create a Unit Test Project" option:
Go to the Solution window and find the "Controllers" folder:
Then click "Add" and select "Controller":
You get the following dialog:
Type "MyController" (must be a single word and must use the "Controller" suffix) , and from the Scaffolding list select "MVC Controller with empty read/write actions":
We got the following Controller containing the action methods for read and write data from a database:
In this Controller, we got 8 Action methods: 5 are meant to render a View for the following actions: Create, Retrieve, Update and Delete, and also a special View for displaying the Details:
In addition, we got another 3 Action methods which handle the HTTP POST requests, one for Create requests which contain the data to create an entity:
Another for Editing an existing Entity, with updated data from the user:
And a last one for deleting an Entity:
This way we created our first Controller with Action methods to perform all CRUD (Create Retrieve Update Delete) Operations.
That's all!!
Happy programming.....
כתב: כרמל שוורצמן
No comments:
Post a Comment