Showing posts with label Proxy Classes. Show all posts

Sunday, July 20, 2014

Step by step how to call a WCF Service Endpoint from both Serial and Asynchromous MVC Controller

   In this tutorial we'll learn how to call a WCF Service from both asynchronous and serial Controllers in Asp.Net MVC. We'll first build a WCF Service, and call it from a Proxy at an MVC Application. Then we'll code an Asynchronous Controller and call the same WCF service but using the async methods automatically created inside the Proxy by Visual Studio.
That way we'll compare the async and serial approaches of calling a WCF service from MVC:


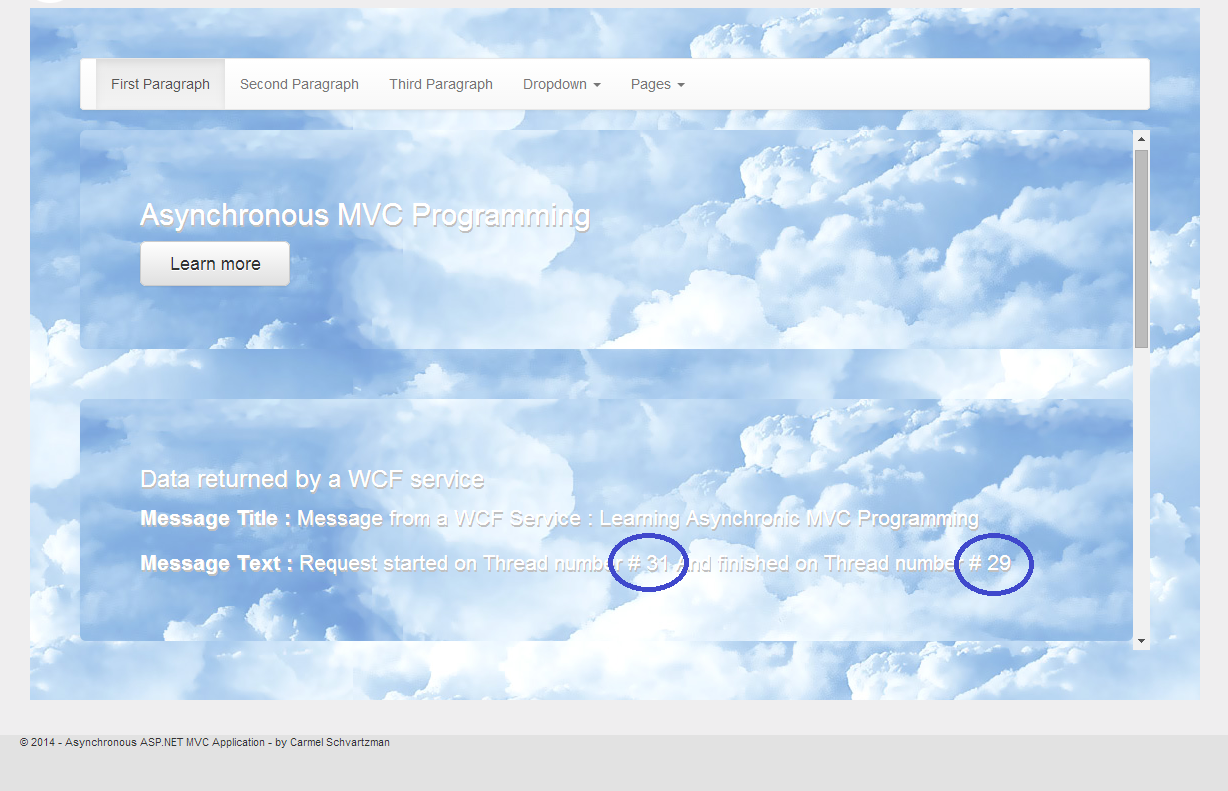
Let's first of all create the WCF as an external project :


Create an Operation contract Interface as follows:
 Then implement that Interface in a class as follows:
 And define the DataContract which is contained in the WCF response:


At the MVC application, add a Service Reference:


Enter the WCF service URL or press "Discovery" :


You'll discover the only method that we declared at the WCF service:


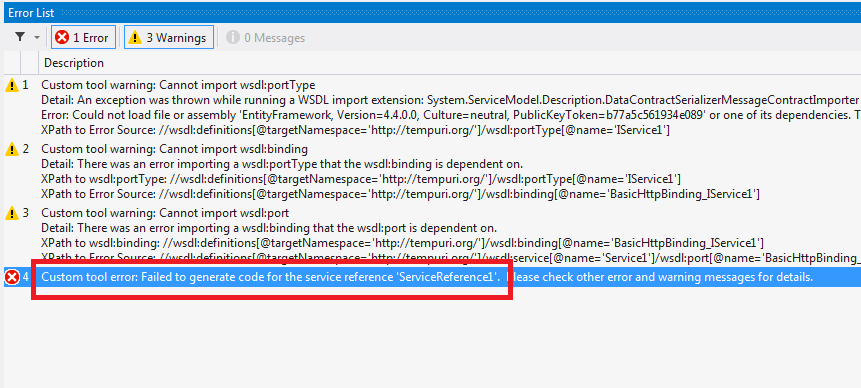
Press OK. If you get an error as this:


That means that your MVC is running at the IIS Express or at the IIS installed at your machine, instead of running on the Developer Server that comes with Visual Studio. The difference is, the former will notice that there are 2 different applications (WCF + MVC) and hence 2 different domains, and will avoid cross-domain calls:


In order to allow cross-domain, add the following code to your web.config file at the WCF project:

<system.webServer><httpProtocol>      <!--THIS IS FOR CORS POLICY-->      <customHeaders>        <add name="Access-Control-Allow-Origin" value="*" />        <add name="Access-Control-Allow-Headers" value="Content-Type" />        <add name="Access-Control-Allow-Methods" value="POST, GET, OPTIONS" />      </customHeaders>    </httpProtocol>  </system.webServer>

After that, may be you don't have an error but you see that the Proxy has not been created at the MVC application, as follows ( you can look for the Proxy classes at the Service References folder of your project: there are supposed to be .cs files containing the methods and classes created to the dialog between the MVC and the WCF service):


Then open the WCF reference at your MVC , and select "Configure" :


There UNCHECK the "Reuse types in referenced assemplies" box:


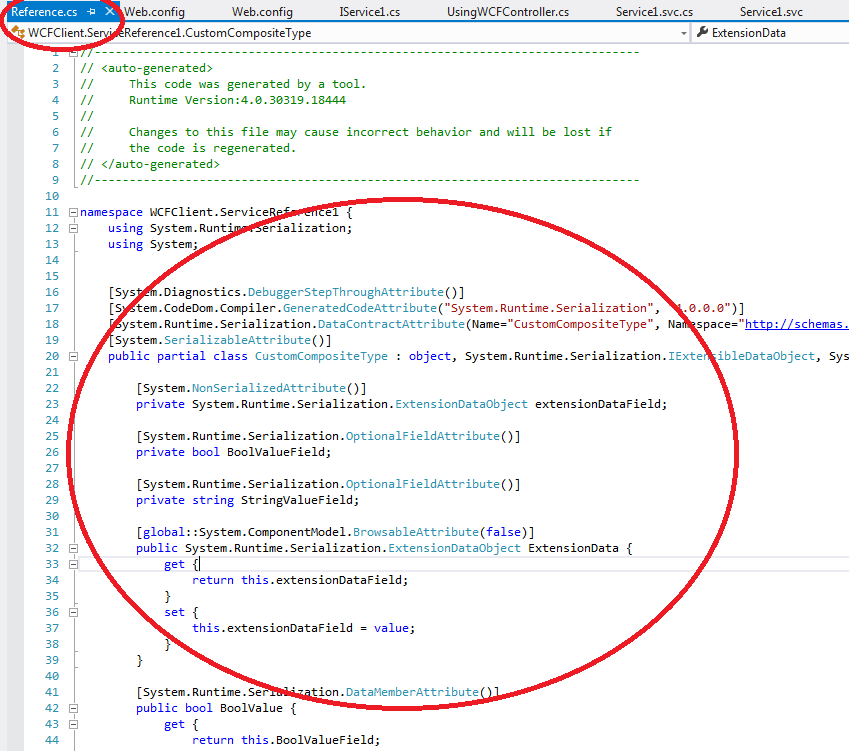
You'll see immediatly that the Proxy has been built:


Take a look at the Proxy and , specially, at the "async" methods created:


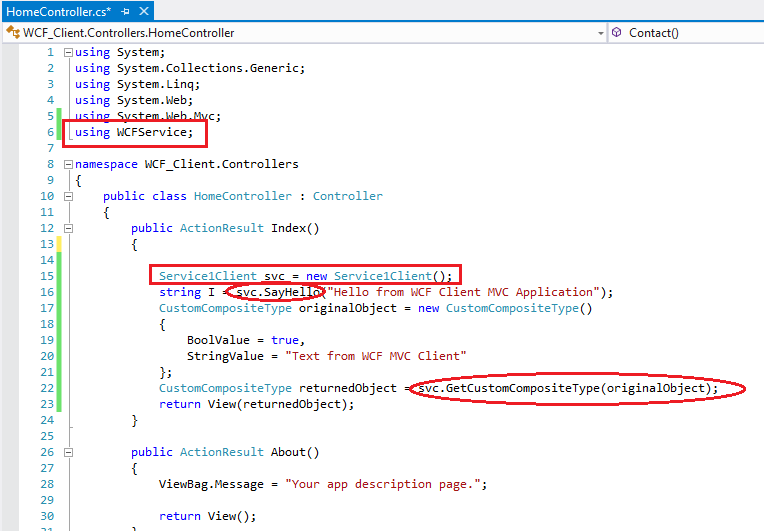
Now add some Controller calling the WCF through that Proxy, and its respective View:


As you can see, both the request and response has been handled by the same thread:


That means, the thread has been blocked waiting for the WCF service to answer the request from the MVC Controller. In other words, if there are 1,000 users in certain moment viewing this MVC web page, the web server will have at least 1,000 threads stuck and consuming its resources while waiting for WCF.
To avoid that situation, let's convert our Controller to an ASYNCHRONOUS method, meaning that no thread will get stuck waiting now:


The only thing you have to add to your Controller is:
1) an "async" expression and a Task<ActionResult> return object,
2) the "await" expression in order to automatically declare this Controller as the callback function to be called back by the:
3) the GetMessageASYNC Proxy method .
That's all the changes. (i added also an "await Task.Delay(3000)" just to make the waiting more heavy, for the test sake). Now you can see that the thread which got the request IS DIFFERENT from the thread corresponding to the callback function which was called by the Proxy when the WCF service sent its response:


That's all!!  In this tutorial we've learned how to call a WCF Service from both asynchronous and serial Controllers in Asp.Net MVC.
Happy programming.....
      By Carmel Schvartzman
כתב: כרמל שוורצמן


Wednesday, June 4, 2014

Step By Step How to manually generate the Proxy classes for a WCF Web Service using the svcutil tool

         By Carmel Schvartzman

In this tutorial we'll learn How to manually generating the Proxy classes for a WCF Web Service using the svcutil.exe tool
When adding a WCF Service Reference to a .Net application , in order to call the WCF Web Service , we essentially need ONLY TWO FILES:
     1)   .cs file : containing all the classes and methods available through the WCF Service, which is called a  Proxy: this represents the WCF Web Service in the Client application. This Proxy allows us to use all methods and classes from the WCF Web Service as if it was a local entity inside your application, 
     2)  web.config file : containing the Web Service endpoint definitions to access to the WCF operations and data contracts.
We'll produce both files by running the svcutil.exe tool on the .wsdl address from the WCF Web Service. Then we'll copy the produced 2 files to our application that, in this example, will be an MVC Asp.Net application.
First we need the url of the Web Service wsdl file. In case you are developing it at your machine, you'll find it at the Properties tab, in the IIS - URL field:


Open .svc file at the url address :

Now open the .wsdl file:


Inside the .wsdl file you'll see the methods ("Operations") that the WCF Service supports:


Open the Command Prompt fro VS2012 : type "svcutil.exe" and the url of the .wsdl file, and also add two more arguments for the 2 files to be created by the tool:
1) /out:  the location and name of the .cs file containing the Proxy classes;
2) /config :  the location and name of the web.config file containing the WCF Endpoint:


The tool will attempt to download the metadata for the WCF Web Service:


After its done, the 2 files had been created :


Open the  .cs file containing the Proxy classes


As you can see, it contains all Operations and Data Contracts for the WCF Service.

The  web.config file contains the WCF Endpoint:


Copy the <system.serviceModel> tag with all its contents, and paste it inside the web.config file of your MVC Client application:


Now copy-paste the .cs file to the Model folder at your MVC Client application :

You'll see that, immediately and without compiling, Visual Studio will get the custom classes and methods of the WCF Service :

Compile and you can use the Proxy classes comfortably in your MVC Client :


If you set a breakpoint and debug the Client, you'll see the data returned by the WCF Service :


That's All !!!! 
In this tutorial we've learned how to manually generate the Proxy classes for a WCF Web Service using the svcutil.exe tool.  

Happy programming.....


כתב: כרמל שוורצמן

Friday, May 23, 2014

Step By Step How to solve the MVC error "Failed to generate code for the service reference" in Visual Studio 2012

         By Carmel Shvartzman

In this tutorial we'll learn How to take care of the MVC error "Failed to generate code for the service reference"  while generating the Proxy classes for a WCF Web Service in Visual Studio 2012
When adding a WCF Service Reference to an MVC application in Visual Studio 2012, there is a frequent issue that resolves in an error, causing the Visual Studio to fail in creating the Proxy classes that represent the WCF Web Service in the Client application. We'll learn how to deal with that error.

The error is produced after we add a service reference to our application, as follows:


The Web Service is found, and we add it to the app:


The error tells us that it was a failure while trying to generate the Proxy code for the Service :


A search at Microsoft Support explains that the bug was fixed in the new version of the .Net Framework 4.5:


The update fixes the case in which the code is not generated :


Indeed ' we can see after the project building, that the Proxy code is empty :


Also, the Web Config file has not been updated to reflect the new Web Service Client Endpoint :


To solve the problem without upgrading the Framework version with the new update available at the Support web site, we just open the Service reference Configuration :


In the Configuration dialog, look for the "Reuse types in referenced assemblies" checkbox :


And uncheck the "Reuse types in referenced assemblies" checkbox .
Build your project again.
Open the Reference.cs file to see the Proxy classes :


This time we got the classes and methods.
Open the web.config file:


As you can see , now the WCF endpoint is referenced.

Now you can use the Service Reference, and its methods :


The WCF Web Service is up and running, and you get the data :


So you can add a new View strongly-typed, using the Proxy classes :


Your View should appear as follows :


This is the composite type sent by the WCF Web Service to our MVC application.


That's All !!!! 
In this tutorial we've learned how to take care of the MVC error "Failed to generate code for the service reference" while generating the Proxy classes for a WCF Web Service  in Visual Studio 2012.  

Happy programming.....


עריכה:  כרמל שוורצמן