By Carmel Schvartzman
In this tutorial we'll learn How to manually generating the Proxy classes for a WCF Web Service using the svcutil.exe tool.
When adding a WCF Service Reference to a .Net application , in order to call the WCF Web Service , we essentially need ONLY TWO FILES:
1) .cs file : containing all the classes and methods available through the WCF Service, which is called a Proxy: this represents the WCF Web Service in the Client application. This Proxy allows us to use all methods and classes from the WCF Web Service as if it was a local entity inside your application,
2) web.config file : containing the Web Service endpoint definitions to access to the WCF operations and data contracts.
We'll produce both files by running the svcutil.exe tool on the .wsdl address from the WCF Web Service. Then we'll copy the produced 2 files to our application that, in this example, will be an MVC Asp.Net application.
First we need the url of the Web Service wsdl file. In case you are developing it at your machine, you'll find it at the Properties tab, in the IIS - URL field:

Open .svc file at the url address :
 Now open the .wsdl file:

Inside the .wsdl file you'll see the methods ("Operations") that the WCF Service supports:

Open the Command Prompt fro VS2012 : type "svcutil.exe" and the url of the .wsdl file, and also add two more arguments for the 2 files to be created by the tool:
1) /out: the location and name of the .cs file containing the Proxy classes;
2) /config : the location and name of the web.config file containing the WCF Endpoint:

The tool will attempt to download the metadata for the WCF Web Service:

After its done, the 2 files had been created :

Open the .cs file containing the Proxy classes

 As you can see, it contains all Operations and Data Contracts for the WCF Service.
The web.config file contains the WCF Endpoint:

Copy the <system.serviceModel> tag with all its contents, and paste it inside the web.config file of your MVC Client application:

Now copy-paste the .cs file to the Model folder at your MVC Client application :

You'll see that, immediately and without compiling, Visual Studio will get the custom classes and methods of the WCF Service :

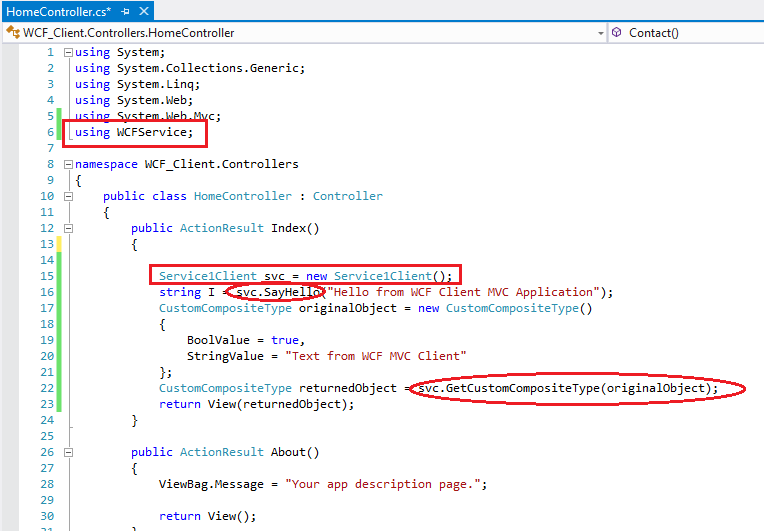
Compile and you can use the Proxy classes comfortably in your MVC Client :
If you set a breakpoint and debug the Client, you'll see the data returned by the WCF Service :

Happy programming.....
We'll produce both files by running the svcutil.exe tool on the .wsdl address from the WCF Web Service. Then we'll copy the produced 2 files to our application that, in this example, will be an MVC Asp.Net application.
First we need the url of the Web Service wsdl file. In case you are developing it at your machine, you'll find it at the Properties tab, in the IIS - URL field:
Open .svc file at the url address :
Inside the .wsdl file you'll see the methods ("Operations") that the WCF Service supports:
Open the Command Prompt fro VS2012 : type "svcutil.exe" and the url of the .wsdl file, and also add two more arguments for the 2 files to be created by the tool:
1) /out: the location and name of the .cs file containing the Proxy classes;
2) /config : the location and name of the web.config file containing the WCF Endpoint:
The tool will attempt to download the metadata for the WCF Web Service:
After its done, the 2 files had been created :
Open the .cs file containing the Proxy classes
The web.config file contains the WCF Endpoint:
Copy the <system.serviceModel> tag with all its contents, and paste it inside the web.config file of your MVC Client application:
Now copy-paste the .cs file to the Model folder at your MVC Client application :
You'll see that, immediately and without compiling, Visual Studio will get the custom classes and methods of the WCF Service :
Compile and you can use the Proxy classes comfortably in your MVC Client :
If you set a breakpoint and debug the Client, you'll see the data returned by the WCF Service :
That's All !!!!
In this tutorial we've learned how to manually generate the Proxy classes for a WCF Web Service using the svcutil.exe tool. Happy programming.....
כתב: כרמל שוורצמן
No comments:
Post a Comment